
The kitchen is one of the most frequently used rooms in homes. It is also one of the places that get dirty very quickly due to regular cooking, eating, and gatherings with family. That is why, it should be as comfortable and functional as possible.
Tiling the kitchen walls and floors can be an excellent way to make this space not only practical but also stylish. Such a type of covering is usually durable, resistant to high temperatures, easy to clean, and effectively protects the walls from moisture. In addition to their practical benefits, tiles can also be a very aesthetically pleasing option. There are countless materials and designs available, and you can choose one that complements your space.
However, in order to make your kitchen appear beautiful, you should also make sure that your tiles are installed properly; otherwise, they may seem uneven, crooked, or even become loose with time. And these are things that no one wants. The question is, how do you tile your kitchen? Should you do it yourself or hire pros? Here is a step-by-step guide on how to tile a kitchen.
Can you actually tile a kitchen yourself?
When having the right tools, materials and skills, you might be able to install tiles in a kitchen yourself. You should keep in mind, however, that this is not a straightforward project. It necessitates the use of suitable techniques and procedures, and is usually best completed by a professional kitchen renovation contractor. Professionals have the knowledge and skills to deal with any problems that may emerge, as well as advise and help in selecting the best materials and design for your area.
But if you still decide to tile the space on your own then you should plan your project carefully and ensure that you feel comfortable in doing some procedures such as preparing the surface, applying adhesive, installing the tiles, and grouting the joints.
DIY method might be a good way to save money. However, it can also be quite risky, especially if you do not have the necessary skills. If you have even the slightest doubt then consider hiring pros.
What materials you will need to tile a kitchen?
Choosing to tile the kitchen walls and floors yourself can be a challenging project, so ensure you gather all the supplies and tools you will need in advance. By doing so, you will avoid having to run to the store mid-task.
Materials you will need
- Enough tiles for your walls and floors. It may seem apparent, but you must ensure that you acquire enough tiles to cover all surfaces. Also, the tiles you choose should be appropriate for the specific application. Do not forget that the tiles for floors are different from those for walls. Floor tiles are usually thicker and designed to withstand heavier foot traffic, while wall tiles might be thinner and lighter.
- Tile adhesive. You should get adhesive that is compatible with both the tile type and the surface type. A mastic adhesive, for example, is appropriate for walls, whereas a cement-based adhesive is typically used for flooring.
- Tile spacers. You will need to choose them based on the size of your tiles and the grout lines you want to create. The most popular tile spacers for walls are typically between 1/16 inch and 1/8 inch (1.5 to 3mm). For floors, you may need larger spacers -1/8 inch or 1/4 inch (3 to 6mm) - to allow optimal tile support and alignment of the tiles.
- Grout. The colour of the grout should match your tiles and the overall design of your kitchen.
Tiling tools you will need
- Tape measure. A 25-foot tape measure is normally enough for most tiling tasks.
- Level. There are several types of levels available on the market, including spirit levels, laser levels, and digital levels. You can pick one based on your personal preferences and, of course, your budget. A basic spirit level is usually a more affordable option and can work well for most tiling tasks.
- Tile cutter. There are various types on the market, with prices ranging from 20-30 pounds to a few hundred pounds for more advanced alternatives. In addition, they may differ in terms of tile material they may be able to cut. So, be sure to get a machine that is specifically designed for your tiles. If your tiles are larger or if you will have to make more intricate cuts and angles then you may opt for a wet saw.
- Trowel, including notched trowel. Pick them based on the size and type of tiles you are planning to install.
- Bucket for mixing adhesive and grout; sponge to clean up excess adhesive and grout during and after tiling.
- Safety gear such as gloves, eye protection, and a dust mask. Always keep your safety in mind when tiling your kitchen, especially when cutting tiles and working with adhesive and grout.
How do you prepare the surface of the kitchen walls and floors?
When you have all of the necessary equipment, it is time to prepare the kitchen surfaces for tiling. The goal is to create smooth and even surfaces on which your tiles will adhere effectively. Here are the steps you'll need to take.
- Clean the wall or floor surfaces. First, remove any dirt, grease, or grime that has stuck on the walls or floors. You can use an all-purpose cleaner or degreaser for this purpose, but make sure to thoroughly rinse the surface with water afterwards. Before proceeding to the next task, allow the surfaces to dry completely.
- Fix any damages. Fill any holes, cracks, or uneven spots on the surfaces with a filler compound. Read the manufacturer's instructions to find out how to mix and apply the product.
- Sand uneven surfaces. Smooth away any rough or uneven sections of the surface with a sanding block or sandpaper. By doing this, the tile adhesive will be able to adhere better to the surface.
If you really want to give the tile adhesive the best bond then you can prime your surfaces. It is a quick and easy task. All you need to do is apply a light coat of primer using a paintbrush.
How to mark and measure the layout of the tiles?
Measure the area you will be tiling
First, you will need to identify the dimensions of the area that you will be tiling. For kitchen walls, measure the distance from the floor or countertop to where the tiles end, to determine the height, and from one end of the wall to the other, to determine the width.
If you intend to tile the floor, measure the length from one end of the room to the other, and the width from one side to the other.
Find the centre point of the wall or floor
The central or middle point will be your beginning point for tiling. To find it, divide the width of your wall in half (be sure to mark the point with a pencil). Similarly, to determine the centre of the floor, divide its length and width in half.
Determine the reference lines and mark the position of the tiles
These lines will assist you in placing the tiles straight and aligned. Using a level, draw vertical lines from the top to the bottom of the wall at the centre point. For your floors, draw a horizontal and vertical line that crosses at the middle point.
Mark the locations for the tiles on the surface using the reference lines as a guide. Also, make little marks with a pencil at the corners or edges of the tiles.
How to set the tiles in place?
Follow the steps below to efficiently install your kitchen tiles and create robust and beautiful tiled surfaces.
Apply adhesive
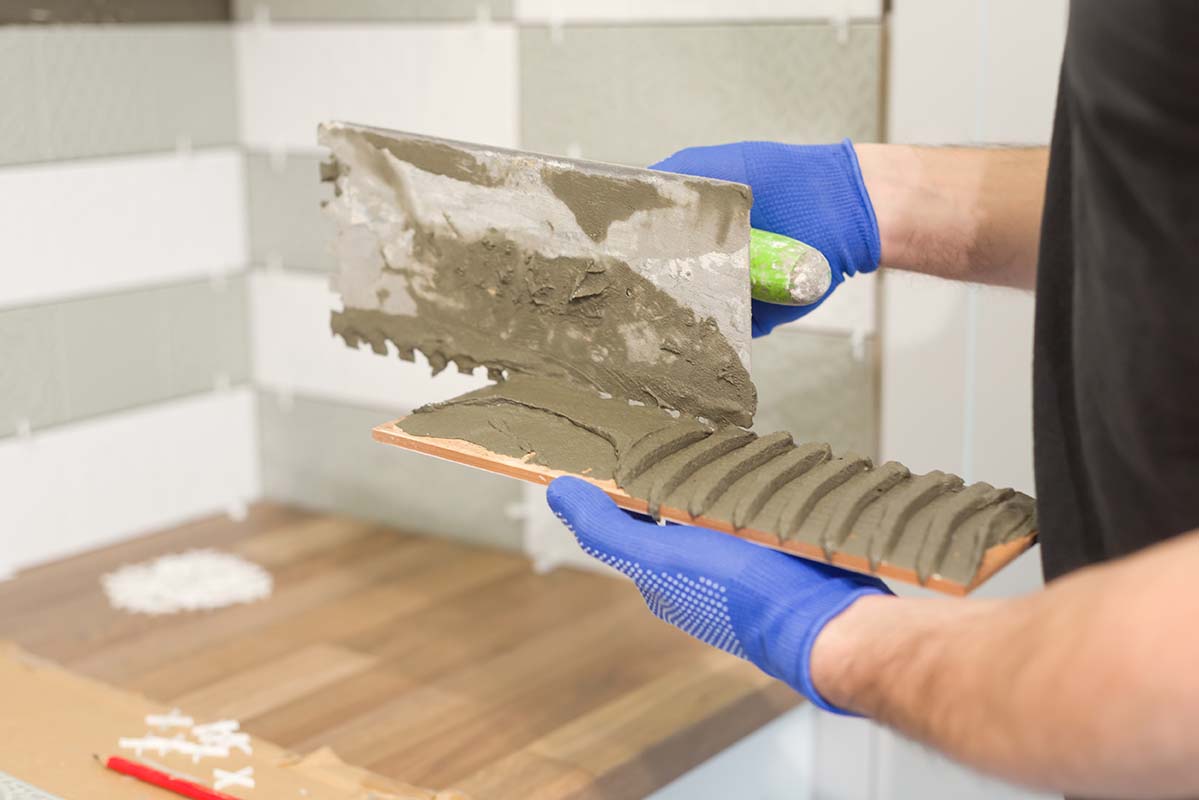
Check the manufacturer's instructions on the powder adhesive and mix it according to them. Use a trowel to stir the mixture properly until you obtain a texture. Then spread the adhesion onto the surface by using a notched trowel. Be sure to start from the centre or middle point. Apply enough adhesive to cover a tiny section at a time, while holding the tiling trowel at a 45-degree angle. If needed or if your tiles are larger, put more tile adhesive.
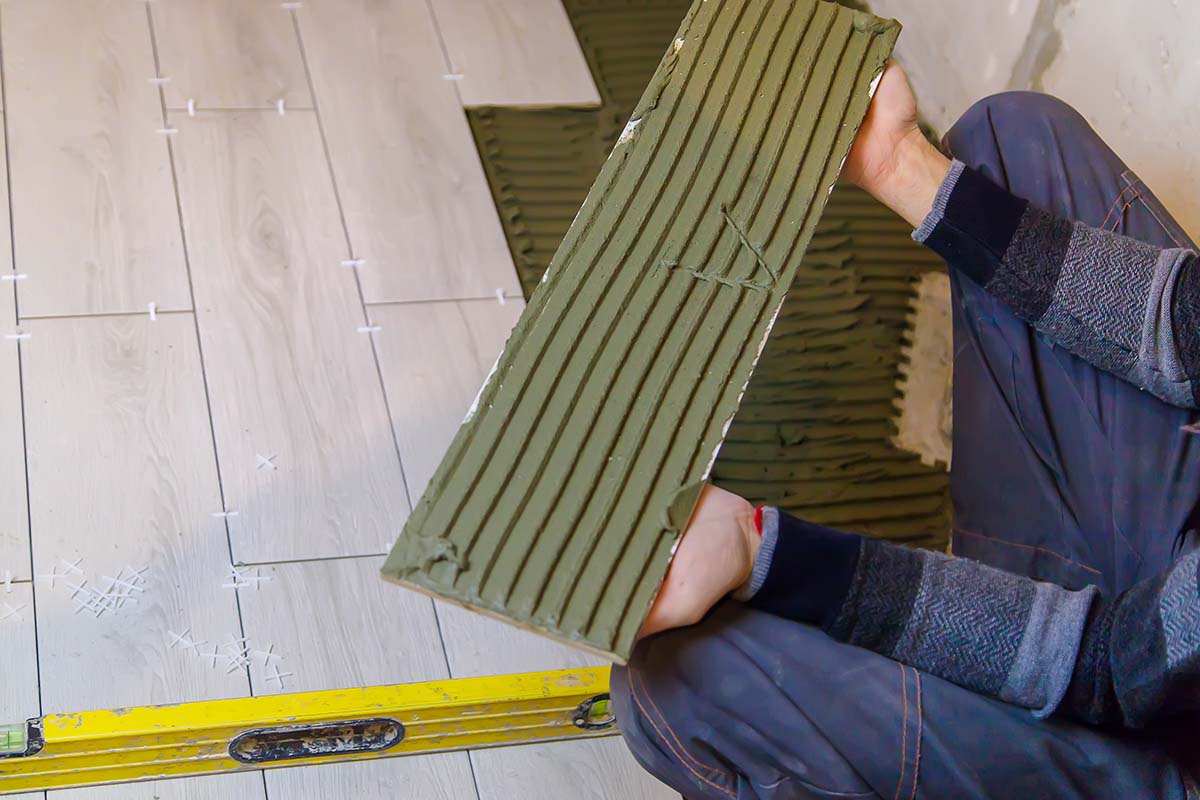
Install the tiles
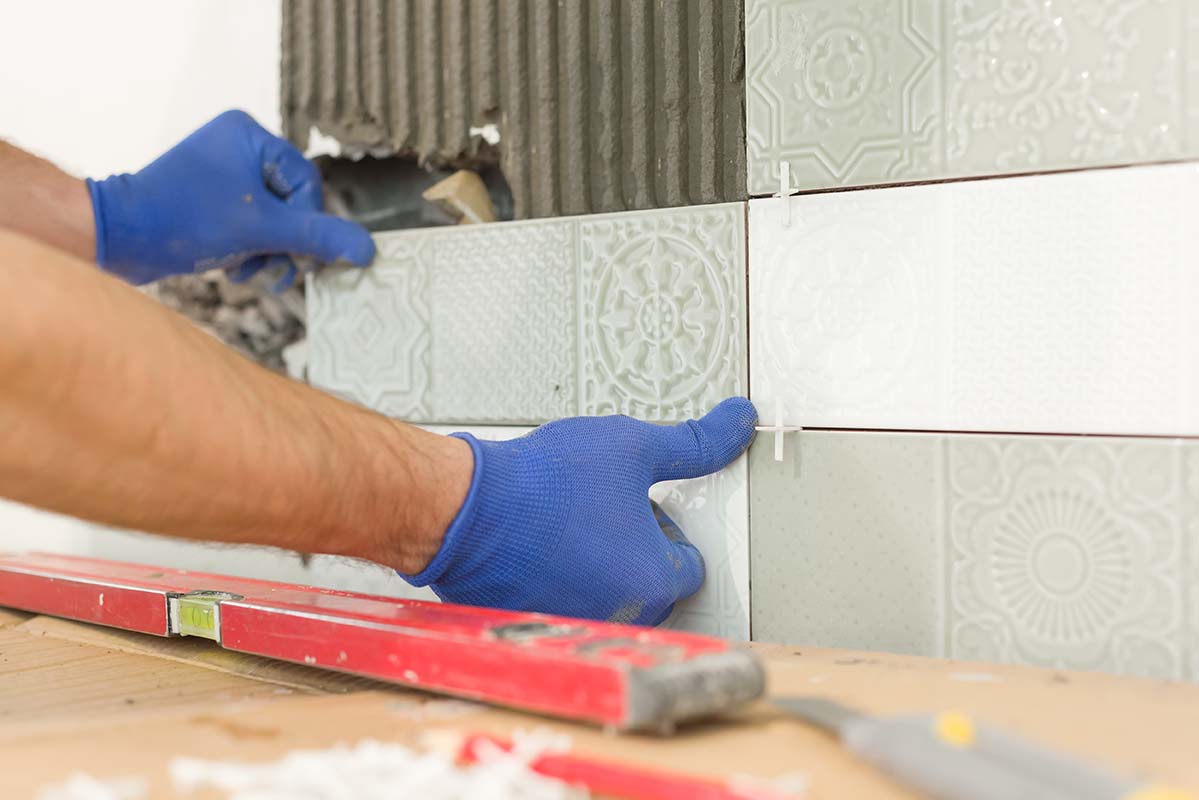
Place the first tile over the adhesive and press it down firmly. Check that it is level and aligned with the reference lines. To keep the tiles evenly spaced, use tile spacers on all sides.
Cover the next section with an adhesive and continue placing tiles, following the same technique as above. Make frequent use of a level to ensure that the tiles are straight and aligned. Tap gently with a rubber mallet to adjust as needed.
If you are installing wall tiles, make sure to work on one wall at a time, so that you can keep control over the process and assure consistency in tile placement. When one wall is finished, repeat the process for the next wall.
Once you have covered the whole wall (or the entire floor surface), let the adhesive dry properly. The drying time should be specified on the instruction label of the product.
For more details, check out our guide on how to tile a wall.
Grouting the tiles
After you have set your tiles in place, you can move to the next step of your tiling project - filling the tile joints. To complete this task, you will need a tile grout, a clean bucket, a grout float, and a sponge. First, check the grout manufacturer's directions to determine the proper water-to-grout ratio. Measure out the grout powder and pour it into the bucket. Then, gradually add water to the grout while constantly stirring the mixture until it reaches a smooth consistency.
Let the grout mixture sit for a couple of minutes so the grout powder can absorb all of the water. Then, using a grout float, scoop a quantity of the grout mixture onto the surface of the float. Holding the float at a 45-degree angle, spread the grout diagonally across the tiled surface, making sure to fill properly the tile joints. To avoid the grout from drying too quickly, work in tiny pieces (no more than one square metre) at a time.
When you complete grouting a section, use the edge of the grout float to remove any excess grout from the tile's surface. Then, using a damp sponge, gently wipe the tiled surface to remove any leftover grout residue.
After the grout has dried, wipe away any leftover grout haze on the tile surface with a dry cloth or towel.
How to cut tiles to fit in spaces where full tiles won't fit?
If you plan to install wall tiles then there is a great chance that you will encounter spaces where full tiles won't fit. In most cases, these are corners created by two walls or a door frame (internal corners) or a corner of the edge of a window recess or a feature wall (external corners). In such situations, you will need to cut your tile to create a narrow strip that seamlessly fills the desired area. How to do so? Here we will explain how to tile corners and achieve a well-finished kitchen wall.
Tiling internal corners
Obviously, the first thing you should do is measure the space where you want to place the tile. Once you have got the width and height of the space, mark them on the surface of your tile. Then, get a tile cutter or wet saw and cut the tile along the marked lines. If you want to achieve more precise cuts, you may also use a diamond blade. Check if the cut tile fits the desired space. If any small adjustments are needed, make them with a tile file.
Use a notched trowel to spread adhesive on the back of your cut tile. Then set it into place so that it is level with the adjacent tile. If needed, use spacers.
Tinling external corners
Measure the length of the edge to which the tile trim will be attached with a tape measure. Afterwards, measure the tile trim to the same size and mark the tile, so that you know where to make your cuts. Cut the tile trim to the length you require with a hacksaw.
Test if the resized tile fits properly around the corner and then spread a thin layer of adhesive on the untiled wall with the help of the notched trowel. Press the tile firmly into the adhesive, making sure that it is aligned with the tiles of the first wall. Then you can continue tiling the second wall, following the same approach.
Repeat the steps above for each tile that requires cutting to fit around an external or internal corner. Take your time and be careful when making the cuts to ensure accuracy and a seamless corner join.
How to tile a kitchen: Other useful tips
- Before you begin tiling, thoroughly plan and measure the layout of your kitchen to see where whole tiles may be most effectively placed. Consider installing them in conspicuous areas or as focal points, such as behind the stove or sink. This not only improves the overall look but also simplifies the installation procedure because no intricate cuts or adjustments are required. If you are looking for more ideas and advice on how to tile a wall then check: With Decorative Panels + How to Tile a Wall | Ideas & Advice | DIY
- If you need to tile external corners (or internal) you may want to use corner trim or bullnose tiles. This will help you simplify the tiling process as well as achieve a smoother edge at the outside corners.
- If there are two walls that meet in your kitchen then you can use trim or edge pieces to create a clean and defined border. It will help you achieve a smoother transition between the tiles on the current wall and the adjacent wall.
- Pay close attention to all the tiles in your kitchen tiling project to ensure a unified and visually pleasing space. Taking the time to carefully plan, measure, and install each tile will yield finished outcomes you can be proud of.
- Don't hesitate to seek professional help if you're unsure about certain aspects of the tiling process or if your project involves complex patterns or materials. They can provide advice and expertise to achieve the best possible results.
Do you tile walls before or after fitting a kitchen?
This decision will mostly depend on your preferences and the specifics of the project. Tiling before installing the kitchen enables a seamless and continuous tile installation throughout the entire kitchen wall. It also ensures that the tiles are laid up to the edges of cupboards and appliances, resulting in a neat and professional appearance. However, it takes more time. Furthermore, it runs the risk of damaging the newly installed tiles throughout the kitchen installation procedure.
Tiling after fitting the kitchen will make the installation of other fixtures easier eliminating the need to cut tiles around them. It also serves as a protective barrier for the walls during the kitchen installation procedure. The disadvantages of this approach are that it may necessitate additional planning to work around cupboards and appliances, and there is a chance of apparent gaps between the tiles and the edges of the fixtures.
How much will it cost to tile a kitchen?
Hiring pros might cost between £20 and £50 per square meter depending on their experience and the complexity of the task but there are numerous factors that will influence the ultimate cost of your kitchen tiling job, making it difficult to provide a precise estimate. The size of the tiled area, the type of tile you choose, and whether you hire professionals or do it yourself will all have a significant impact on the pricing.
In some circumstances, tiling the kitchen yourself may be less expensive. However, it will usually take significantly longer, especially if you have to tile a larger area. You will also need to purchase some necessary equipment, which can be costly.
Tile prices can vary significantly based on the material, style, and brand. Ceramic or porcelain tiles can cost between £15 and £50 per square meter on average.
Natural stone tiles, such as marble or granite, are typically more expensive, ranging from £30 to £100 per square meter or more. The floor tile might also be more expensive than the wall tile. However, it really depends on the particular material and style you choose.
Frequently asked questions
Can mosaic tiles be used in a kitchen?
Yes, these smaller tiles can actually be a great way to create unique focal points, borders, or decorative accents within your kitchen design. They can add an extra layer of visual interest and versatility to your kitchen space.
Can you tile directly over existing tiles?
Yes, in some cases, it is possible to do so. However, before undertaking such a project you should consider the condition and suitability of the existing tiles. They should be in good condition and firmly adhered to the substrate. If you plan to tile over existing tiles make sure to also consider the possible height increase. It can add extra height to the floor or wall, which may affect transitions, door clearances, and other elements in the room.
If you want to know more about updating kitchen tiles without removing them, please see: How to Update Kitchen Tiles Without Removing Them?
What is the best tile to use on a kitchen floor?
When it comes to kitchen floor tiles, natural stone and porcelain tiles are often considered the best choices. Both of them are highly durable and can create a timeless and elegant look in a kitchen. However, when choosing the most appropriate tile for your floors consider your personal preferences and needs, as well as your budget.
What floor can you tile on?
Tiles can be fitted on different types of flooring surfaces including wooden floorboards, concrete floors, cement backer boards and so on. Tiling onto concrete floors is normally quite simple because such surfaces usually require little preparation and offer good stability. However, keep in mind that the particular requirements and recommended installation methods can vary depending on the type of tile, tile size, and manufacturer's specifications. If you want to achieve the best results for your kitchen refurbishment in Surrey, feel free to consult with our professionals.