
Are you looking to learn how to tile your kitchen floor? Tiling a floor is surprisingly easy but there are some tricky parts that you should be prepared for. Before you jump onto the DIY bandwagon, we recommend you go through all the steps in your mind and determine the set of skills and tools you are going to need.
Luckily, you landed in the right place. In this post, we will teach you how to lay your floor tiles by yourself so you don’t have to call in a specialist.
Embarking on a DIY kitchen tiling journey? While learning how to lay tiles can be a rewarding experience, ensuring a professionally finished, durable, and aesthetically pleasing kitchen floor might require an expert touch. Explore bespoke kitchens in Surrey and discover how our seasoned professionals can bring your dream kitchen to life, ensuring every tile is laid to perfection! Connect with us NOW and turn your kitchen into a masterpiece!
Key Takeaways
- Tiling a floor is considered a relatively straightforward DIY job; however, it can be tricky and it still requires some basic skills
- While you can tile your kitchen on your own, you should take into account the hassle of the whole process
- To get started, you need to gather a few tools and materials
- Before you begin, you have to prepare the floors by removing any debris, cleaning the surface, finding the midpoint of the room, and preparing the tile adhesive
- Remember to cut tile pieces around the edges with a tile cutter so they are ready to use once you start tiling
- Apply the adhesive or mortar working at a 45 degree angle
- When laying tile, you should work your way out of the room, your back facing the door so you don’t have to step on any tiles you already laid
- Plan ahead and ensure the tiles are evenly spaced
- Finish off by applying grout and cleaning any residue that you have left behind
Can I Tile a Floor Myself?

In theory, installing a tile floor in the kitchen is something that anyone can do. The simple action of putting adhesive on the tiles and placing them on the desired surface is what makes people think it’s a cinch.
The problem is, there are some tricky aspects to the job that may interfere with the process, making it less fun and more of a hassle. For example, you have to designate a starting point and be very precise in your measurements.
Another thing to take into account is the quality of the job and the final results. Unless you grout the gaps between the tiles the right way, this might lead to cracks along the edges. Grout is also essential for keeping the tiles in place.
Many people share that if they had tasked a professional with the tiling, it would have looked better and it would have been executed much faster. They admit that their DIY tiling project involved more work than they had imagined.
Materials and Tools Needed for Tiling Floor in the Kitchen
- Pencil or a piece of chalk to mark the floor tile
- Water
- Sugar soap
- Clean sponge
- Small bucket
- Protective gloves
- Protective floor covering
- Adhesive/ mortar
- Grout for floor tiles
- Large bucket
- Tile spacers
- Grout float
- Spirit level
- Tape measure
- Tile cutters for cutting tile
- Notched trowel (find a suitably sized one for the type of tile you have)
- Screws
- Timber baton
- Flexible sealant and caulking gun
- A wet saw with diamond blade
- Drill and mixer attachment (if necessary)
- Tile nippers (optional)
How Do You Prepare a Floor for Tiling?
For starters, you should clean the floors and remove any debris. It’s important that the surface is even, so you have to fix any cracks or bumps. If there are any damaged parts, take care of them. It goes without saying that you have to remove the existing floor tiles beforehand.
Depending on your floor type, you will have to take corresponding steps to prep the surface. For instance, concrete floors need priming and wooden floors over boarding. If the floors are uneven, you want to level them out using some kind of levelling compound.
Finding Your Starting Point As You Get Ready to Lay Floor Tiles
The next step is to measure the floor for your new tiles with a measuring tape. Start by calculating the width of the room.
Find the centre-line
This is where you should begin tiling from. Then take a tile and place it in the centre without adhesive. This is called a dry lay. Simply lay out a row of tiles starting at the centre of the room and working your way out toward the walls. Make sure to mark the width of the tiles as you go. Check out our guide on specifically how to tile a wall for more detailed information.
The majority of folks automatically assume that the room is perfectly square and it’s this type of projects that prove them wrong. That’s why several measurements may be necessary to find the middle point. You may in fact discover the opposite walls aren't equal size. Another thing to take into account is the focal points in the room. This is where you want to place full tiles for a neat finish.
Go for a baton or spirit level
So, this step will teach you how to find the best place for the tiles to sit. The easiest way to get it done is to use a baton of wood or a spirit level. They will help you keep the first line aligned. All you have to do is mark the width of the tile surface on it with a piece of chalk instead of aiming for the floor.
Remember to factor in the width of the grout joint. Draw a straight line. Keep in mind that chalk may get buried in adhesive. When you reach the wall, measure the gap. This is the space for the narrowest tile. If there is only a tiny portion of the tile left, you may have to move your centre tile around until you find the perfect spot so that the edges look good.
As you finish marking your baton with chalk lines, transfer the widths onto the floor. Again, you want to begin at the centre and gradually move towards the edges of the room.
If you follow this strategy, it will be easier for you to create a tidy and symmetrical look.
Consider dividing the job into chunks
Another consideration to make is whether you should tile the floor in one go or divide the task into two big chunks. If you plan to use the kitchen in the meantime, it’s best to do one half of the floor one day and leave the rest for another time. Don’t forget that you have to allow enough time for the tiles to dry.
Cutting the Floor Tile before You Lay Floor Tiles
When you finally know the width of the tiles that are going to fill the gaps in those edges, you should proceed to cut tiles into smaller pieces. To make straight cuts, employ an electric tile cutter or manual cutter.
The best way to be sure you have the most accurate measure, place one tile over the nearest whole tile and see where they overlap. Using the edge of the top tile as your guide, mark that area with a pencil and then make some cuts.
Preparing Tile Adhesive so You Can Lay Floor Tiles
Time to mix the adhesive with some water. There are different types available. You can get a ready mixed adhesive or diluted PVA adhesive. Whatever you choose, make sure to follow the manufacturer's instructions on the bag to get the right proportions.
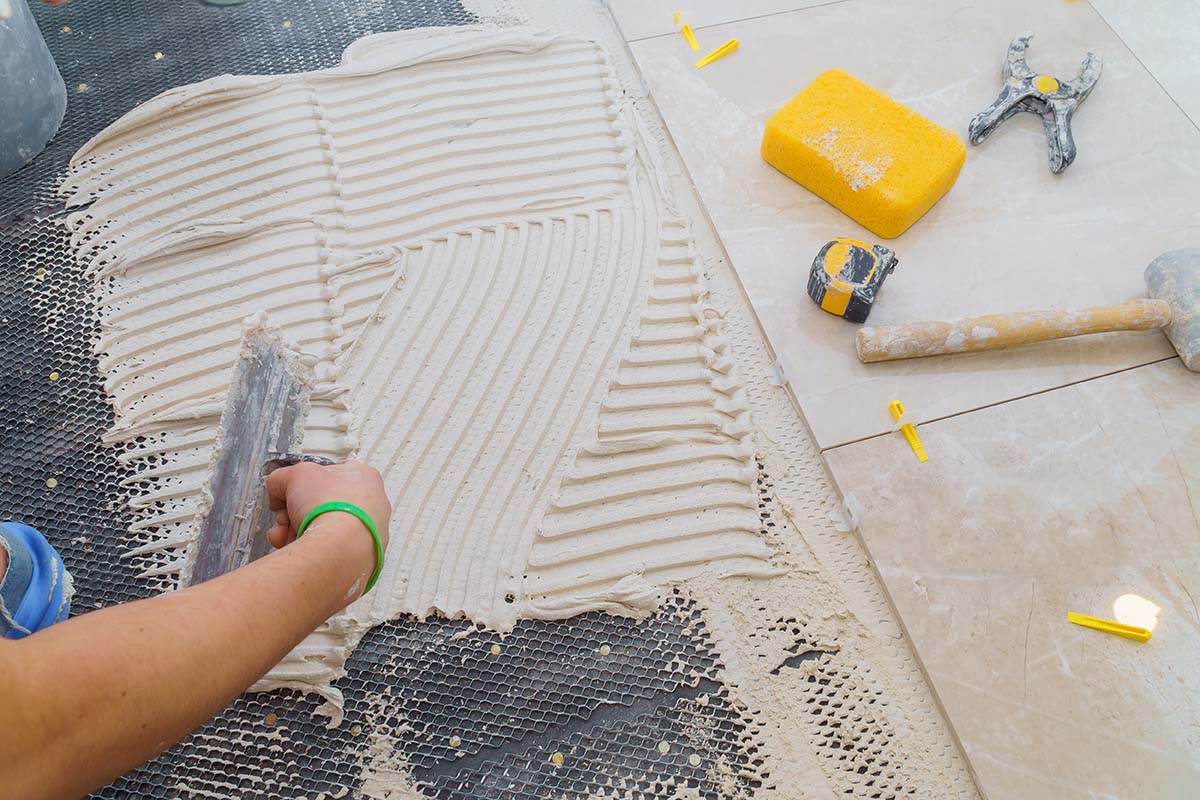
This is an important step, so don’t overlook it. When the mixture is ready to use, transfer some adhesive on a tiling trowel and spread it on the floor surface.
Work at a 45 degree angle, making sure to spread the glue evenly. It’s not recommended to cover the entire floor in one go. You want to work section after section as the adhesive will dry quickly once applied.
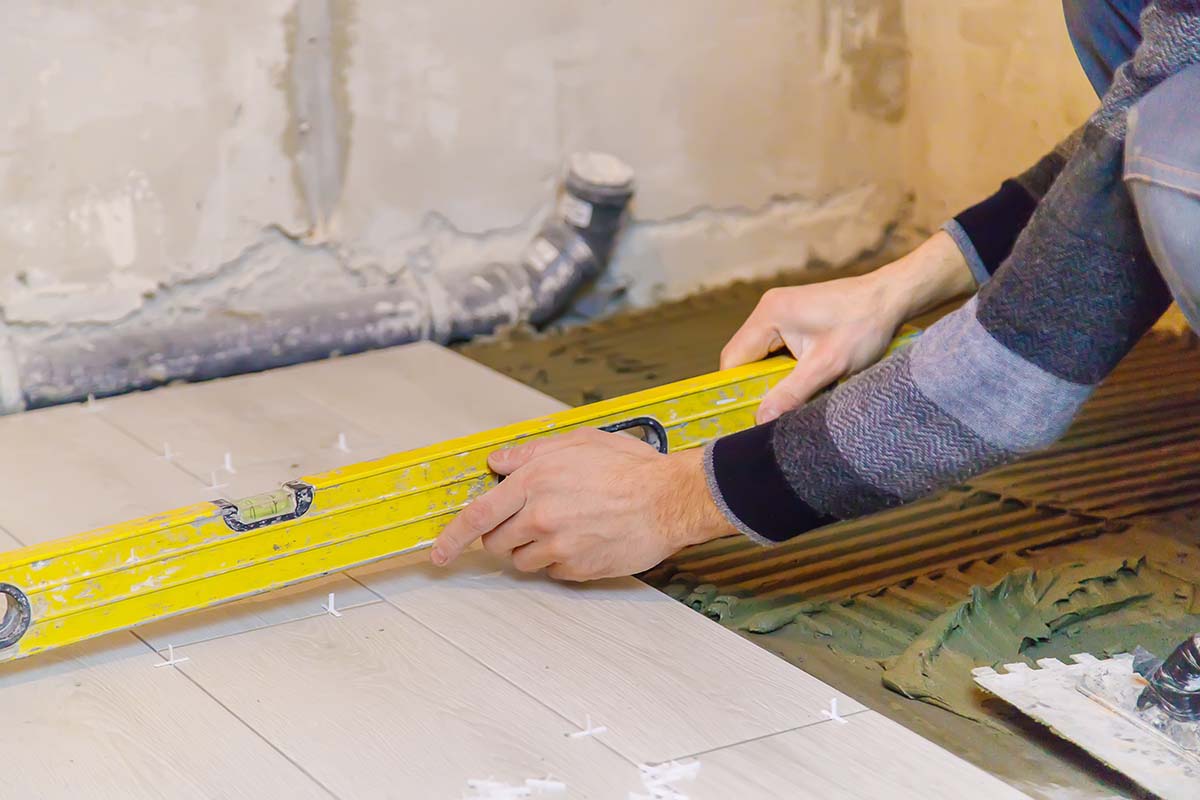
Laying Floor Tiles and Tile Spacers
Now, let's get straight to laying floor tiles. Place the first tile (centre tile) firmly but do not exert too much pressure. Your goal is to ensure they stick to the tile adhesive but you don't want to go overboard with it. Proceed with the next tile. If you notice one of the tiles is slightly out, tap on it with a rubber mallet or the handle of the notched trowel.
If you have larger tiles, it might be a good idea to apply a bit of adhesive on the back as well for a good bond. Use a thin layer for large format tiles.
While you are onto the first row of tiles, make sure you can still see the marks you made with a piece of chalk/pencil. But as you move on to the next row, you no longer need the chalk line.
Keep in mind that you have to put spacers between each tile. Wipe down the pieces with a damp cloth to get rid of any stray adhesive. Needless to say, be careful not to shake the tile out of position.
The ideal pattern to stick with is to move toward the room’s entrance. So, you have to move backwards so that you can prevent having to walk on the tiles that you just placed.
When you lay floor tiles everywhere, leave them overnight to dry. You may need to consult the packaging of the tile adhesive for specific instructions on the desired timeframe.
Preparing Grout for the Tile Joints
Once you tile a floor, you're not over. The next step is to prepare the tile grout. Consider buying sanded grout because it's easier to apply if you are a beginner. It also happens to be a more cost-effective option, so that's another benefit. The right proportions should be stated on the label of the package.
Remember that it can harden fast so don’t mix it all at once. Instead, work in small parts. Remove the tile spacers so they don’t get in the way. Clean the grout joints as necessary before grouting.
Grouting with Grout Float
Start grouting by applying the designated product in the grout joints. Finish off with a rubber spatula to create smooth lines. You may also resort to grout finisher. Leave it to dry. When the grout lines are completely dry, run a damp cloth or a damp sponge over the tiles once again to remove any excess adhesive or grout haze from the tile face.
Try to rinse it as often as possible so as not to spread the dirt to areas you just cleaned. Using a grout profiler, eliminate excess grout where applicable.
It’s wise to apply protective sealant onto your tiles, especially if they are porous (encaustic, terracotta, natural stone, etc.). This will prevent them from discolouring and staining over time. You should also seal the grout with a product that matches your grout. A sealant gun will do the trick. Try not to use the kitchen for 24 hours following the last step.
If you only want to update your tiles without getting new ones, you're in luck - we've written a detailed guide on how to update your kitchen tiles without removing them as well as a step by step guide on how to tile a kitchen.
Unleash the true potential of your culinary space with a comprehensive kitchen renovation tailored to your unique tastes and needs. Whether it's a subtle refresh or a complete transformation, ensuring that every detail is meticulously curated and executed can elevate your kitchen from mere functionality to a heartwarming, central hub of your home. Explore with us the world where your dream kitchen becomes a reality! For unmatched quality and exquisite designs in kitchen renovation, get in touch with our dedicated team today!
FAQ on How to Lay Floor Tiles
Where do you start when laying floor tiles in the kitchen?
If you want to tile a floor, you should start at the midpoint of the room. This will allow you to create even edges and a more symmetric look. Your tiled floor will be more visually appealing.
What do you put under the tile floor in the kitchen?
Before you lay floor tiles, there is some prep work involved. It’s called underlayment and it can be made of different materials, the most common being tile backer board and cement board. They are best for wooden floorboards. You can also use plywood for underlayment as you prep for tiling a floor.
How much does tiling cost in the UK?
The prices for tile flooring vary depending on the type of tile you choose and the size of the room. Typically, you will pay anywhere between £50 per m2 and £200 per m2. Don't forget that laying tile flooring requires adhesive and grout. They add some £10 per m2 to the cost.
What is the formula for calculating tiles for your flooring?
All you need to do is to divide the square footage of the space by the area of each tile. Be sure to account for the cuts and waste by adding 10% to the final calculation.